
Do you want to disable your laptop’s keyboard? Unfortunately in Windows operating system, there is no easy way to turn off or disable the laptop’s keyboard.
With the right knowledge and guidance, you can disable the keyword and can attach an external keyboard or turn it on after sometime when you want.
Laptops share almost all features of a desktop computer, the basic computer accessories you need to operate a system; a mouse, keyboard, monitors.
The problem is, on laptops, unlike computers you cannot disconnect any peripheral and replace it if it is not functioning well.
If a laptop’s keyboard, stops working, either partly or completely, you cannot disconnect and connect a new one. You will have to visit the hardware service center and gets a costly replacement of the keyboard.
That’s the reason, people just do not go to upgrade the hardware, they prefer non-functioning keyboard and connect a normal, external keyboard to get the work going.
But, the problem is, people want to disable the built-in keyboard to avoid unwanted, unintentional key presses.
Why would you turn off a laptop keyboard?
There are more than one reasons, you would want to disable a laptop’s keyboard
1) Damaged keyboard
A damaged laptop keyboard is a real pain in the neck. It randomly presses keys and halts issues. It can make your system to restart or behave strangely.
This can undo you all work with just one press, and you will have nothing to do to get the things or files back. Until, unless your laptop is repaired it would be advisable to turn off the built-in keyboard’s functionality.
2) Turning off keyboard intentionally
You may like the idea of turning off a keyboard intentionally when you are stepping away from your laptop for security measures.
The practice can be fruitful in your office environment when something is rolling on in your laptop and you do not want some unintentional keystrokes to pause your work.
3) Turning off while watching videos
If you are watching videos with your little one, the chances are, he would love to press the keys to pause or close the video.
These keystrokes can make your experience poor, as you cannot send him to his mom as she might be cooking or doing household chores. The temporary turning off the keyboard will help you have a smooth undisturbed experience.
Now, like its predecessor’s windows, 10 as well do not offer any simple and straightforward way to disable the keyboard. But, disabling keyboard in Windows would not be a big issue, by using third party apps or without using them, one can get the job done.
So, stick with the guide and here we share with you some working method of turning off or disabling the laptop’s keyboard.
Here are the 3 Ways To Disable Laptop Keyboard on Windows 10, Mac and Ubuntu:
1. Disable keyboard using device manager
On a Windows computer, you access all settings through the device manager. The device manager is a simple and straightforward way to access keyboard settings and disable the keyboards.
The method is not useful for a built-in keyboard; the computers with built-in the keyboard cannot use the method to disable keyboard functionality.
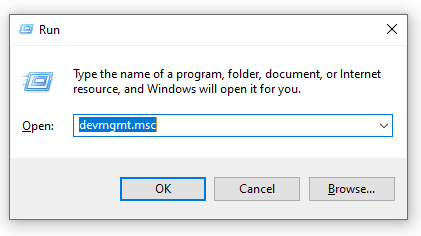
Open the device manager, just press the windows button and search for ‘Device Manager’, you can also search using another method. Press Windows logo key +R to open a run dialogue, and type ‘devmgmt.msc’ into the dialogue and press enter, you will access the device manager direct using the simple command.
In the device manager, locate the keyboard options and after that double click on the section to expand it. All the keyboards connected to your device for the moment will be displayed in the section, you can go with the keyboard you want to disable, in our case, built-in laptop keyboard.
Now, right-click on the keyboard and you will get many options, click on disable and it will open a dialogue box to confirm whether you actually did it or mistakenly press the key.
Press on confirm, and it will disable your laptop’s functionality. From now on, you will not be able to use your keyboard for these sessions.
You can also go with the uninstall option, the laptop will uninstall the Keyboard’s driver and will make it stop working for the session. Once you do, again the same confirmation box will appear, click on OK, it might ask to provide admin access to carry on operation.
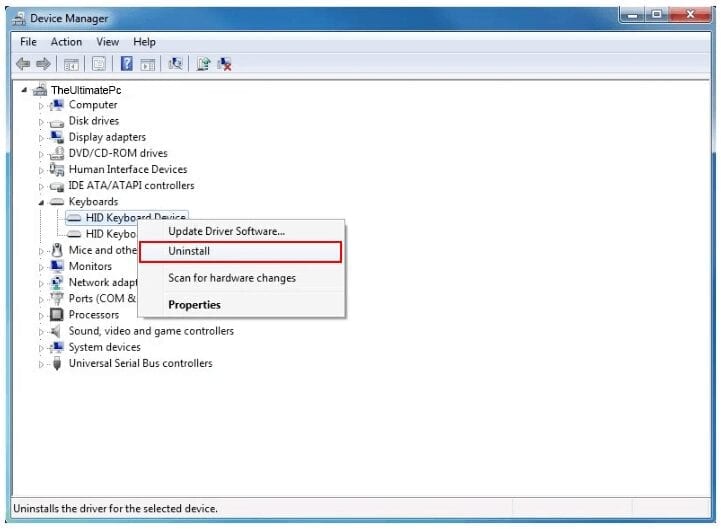
Note: The method will not permanently uninstall or disable your laptops’ keyboard. Once you restart your laptop, Windows will automatically see what changes should be made to make a laptop error-free and install the required windows’ keyboard driver.
Windows will automatically detect and reinstall the driver for the next time and it happens with every restart. The system scans the device manager and looks for the hardware changes necessary.
Another solution
If there is no disable option available on your device manager’s keyboard section. And when you uninstall the driver, the system goes to restart and get the default setting back with no keyboard disabled you need to follow this.
- Open device manager
- Select now update drive option
- This will lead to either go with existing driver or check online, go with existing drivers only.
- Display incompatible drivers
- Choose one
- Restart
Now, the laptop keyboard will be disabled. To get back your computer into the default state
- Choose compatible drivers
- Restart
If you want to permanently disable a laptop’s keyboard. You will have to probably go deep; the following method will help you have the job done for a damaged or corrupt keyboard.
2. Turning off Windows default feature
If you want a permanent change, a change where you will not have to worry about the restart will get back the default settings. You will have to turn off windows’ ability to automatically fetch required drivers in the system.
Otherwise, the feature will spring back the keyboard into your life every time you reboot. The process might be lengthy and will require a special focus to get it done.
1) First, go to Start and type ‘gpedit.msc’
2) On the left side of the windows screen, you will see a long list of different functions with different files name, do not panic, we need to go in “computer configuration”.
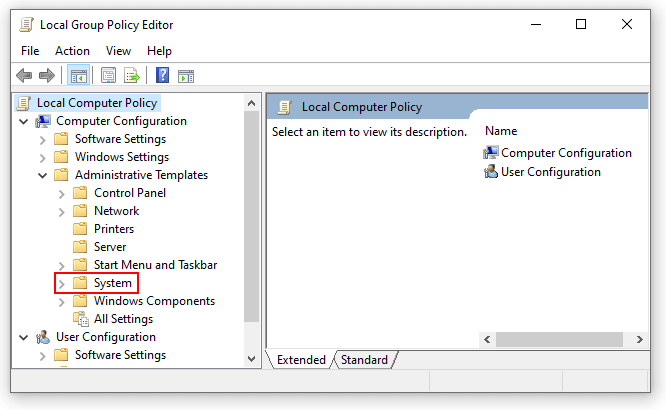
3) Click on the section, it will further expand the section into many; you need to click on “Administrative templates” and then “System”.
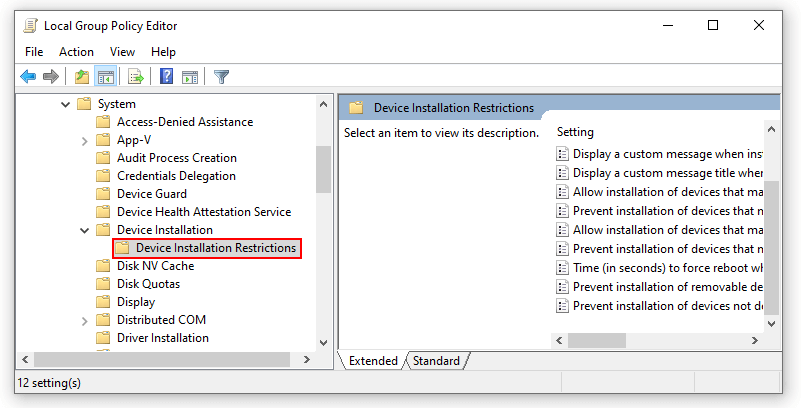
4) Head into “Device installation restriction”, with this click you will see many options on the right side. A new tray will open on the right side; the section helps you control the installation of different built-in features or drivers on your computer.
5) You should right-click on “Prevent Installation of Devices not described by other policy settings” and edit the option.
6) The option by default is, “Not configured” or “Disabled”, you need to enable the option, and click on Ok to make the changes permanent.
7) Now, you are done, from now one, any intentional change in the hardware settings will not be restored back by the default system.
8) Go back to our device manager method and follow the guide and uninstall the keyboard driver to get the keyboard permanently disabled.
3. Using Third-Party Apps Like KeyFreeze
If you want to see a temporary turn of your windows’ keyboard, you need to use third-party apps. These apps are impressive and you get your desired job done without paying a single penny.
Kyefreeze is a simple yet useful application; it locks your laptop’s keyboard and mouse. The user interface of the application is simple and straightforward.
It offers simple features with one large button if you click the button the timer starts and within five seconds your keyboard will be turned off. Not only the keyboard but a mouse, would no one be able to input using these input devices.
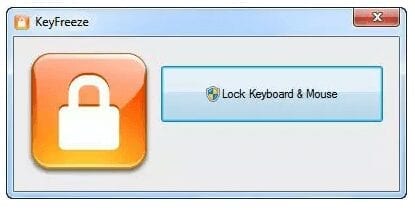
To get back your keyboard into life, just press “CTRL+ALT+DEL” and the keyboard gets back. The application works fine with all Windows versions and offers a smooth working experience.
You can save your laptop from getting unintentional input when your kids are around and you working on a project or going away from something.
2) Keyboard Lock
A keyboard lock is another exciting application to temporarily turn off keyboard input along with the mouse. The features seem resembled KeyFreeze but the vital difference is, this app offers you password protection and you can disable keyboard and mouse separately or both.
You can disable the keyboard or mouse alone and disable them respectively. All you need to do is put a password and click on the start button. You can unlock the keyboard by just providing the right password.
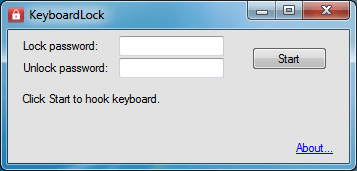
If you have locked the keyboard and now want to lock mouse as well, simply put the password and press the start-icon again. The application does not affect any other functions, apps or programs.
For instance, if something is played on your computer that will be in the playing mode with zero effect on the running apps. Get the keyboard and mouse again function, by just providing the password.
3) Anti-Shaya
Anti-Shaya is a simple application that protects your laptop from unwanted and unintentional inputs. Though, the original idea of developing this application was to protect the laptop and computers from cats that make changes by climbing on the keyboard and trying to use it for playing music.
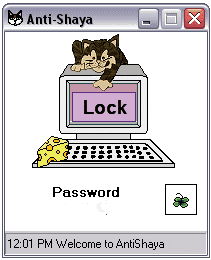
The users can use it for preventing others using the keyboard since it comes with password protection. The application needs no installation, just save it to your computer at any location and execute whenever you want.
The interface of the application is simple rectangular with an uncomplicated, uncrowded layout. You set your password and get the laptop protected from unwanted inputs.
You can edit the password as well by accessing the same layout. The keyboard can be activated by clicking on the application and providing the right password. Be careful, do not forget the password.
4) Kidkeylock
The application Kidkeylock helps you have a protected keyboard from unintentional inputs. The application is password protected and helps disable keyboard, touchpad/mouse.

The best thing about the software is its user-friendliness. You can even choose lock middle mouse button, right mouse, double click and mouse wheel.
Every feature integrated into the software wrapped into a simple screen, you can choose whatever you want by just visiting one simple window.
Set your password and lock keyboard, mouse, and trackpad. With just providing the set password, get the input peripherals back into life.
Disable Laptop Keyboard on Mac
If you are a Mac user and want to disable your laptop’s keyboard, the guide will also help you have the desired thing done without going through big trouble.
The use of tools and tricks on a Mac is difficult to compare to Windows OS, you will have to use some script files. Do not worry, we provide you the script and complete guidelines to get it done.
Using script
You need to open Applications folder on Mac
- Provide the ‘Utilities’ menu
- Double-click on the terminal
- The terminal will be opened, and when it opens you need to put the following script.
- sudo kextunload /System/Library/Extensions/AppleUSBTopCase.kext/Contents/PlugIns/AppleUSBTCKeyboard.kext/
- Now press enter
- To get it enabled, follow the 1-3 points and when the terminal opens to put the following scripts.
/System/Library/Extensions/AppleUSBTopCase.kext/Contents/PlugIns/AppleUSBTCKeyboard.kext
This will disable your laptop’s keyboard and you would not be seeing it functioning again. Yes, after a restart the system will automatically fetch the necessary files and make it enabled.
Using Application
You can find many third-party apps to your Mac laptop keyboard disabled. The mentioned Karabiner app is our tested one and provides impressive service without costing any money.
Disable Mac using Karabiner:
- Download the application; we have given you a direct download link of the website
- Search Karabiner-Elements.sparkle-guided in your downloads and open it
- Drage the file to the application folder, this will install it on your system
- Open the Karabiner-Elements
- Type Disable
A new window with the following text will appear ‘Disable internal keyboard while external keyboards are connection’, tick the box and you will get the mac keyboard disabled.
Disable Keyboard on Ubuntu Laptops
Yes, Ubuntu laptop keyboard disabling is a little trickier and needs a bit more skill. You need to identify your laptops’ keyboard ID and manually do it using command.
To find the device’s ID run ‘Xinput-list’ command. This will display all devices connected to your Ubuntu laptops with their codes. You need to check your keyboard and read its code to disable it.
You need to run the following code with your device ID as well mentioned.
- xinput set-int prop [ID] “Device Enabled” 8 0
To enable the keyboard again run the following commands.
- xinput set-int prop [ID] “Device Enabled” 8 1
You will get the laptop keyboard back into working.
Get your keyboard repaired
Other than the solutions we mentioned, if your keyboard is damaged or broken, you should repair that. The use of an external keyboard would not be a long-term solution.
A laptop is meant to be portable, if you have to carry around an external keyboard and mouse along, the portability section vanishes. So, as quickly as you raise your budget gets it repaired. If you do not pay heed to this, the problem can be bigger than just this.
As the keyboard is connected to the motherboard, there are possibilities that the damage can affect other vital hardware components attached.
Conclusions
We mentioned more than one solution for your Windows, Mac and Ubuntu laptop. Hope the solutions will make your computing life easier than before.
Be it, cats, clueless family, or a friend that accidentally clicks your laptop’s keyboard, the locking keyboard can be useful.
When you have your tools in place, you can have a sigh of relief that the keys will remain locked no matter how hard your little one tries.


No comment yet, add your voice below!