How To Disable Laptop Keyboard on Windows 10, Mac and Ubuntu

how to disable laptop keyboard

Do you want to disable your laptop’s keyboard? Unfortunately in Windows operating system, there is no easy way to turn off or disable the laptop’s keyboard.

With the right knowledge and guidance, you can disable the keyword and can attach an external keyboard or turn it on after sometime when you want.

Laptops share almost all features of a desktop computer, the basic computer accessories you need to operate a system; a mouse, keyboard, monitors.

The problem is, on laptops, unlike computers you cannot disconnect any peripheral and replace it if it is not functioning well.

If a laptop’s keyboard, stops working, either partly or completely, you cannot disconnect and connect a new one. You will have to visit the hardware service center and gets a costly replacement of the keyboard.

That’s the reason, people just do not go to upgrade the hardware, they prefer non-functioning keyboard and connect a normal, external keyboard to get the work going.

But, the problem is, people want to disable the built-in keyboard to avoid unwanted, unintentional key presses.

Why would you turn off a laptop keyboard?

There are more than one reasons, you would want to disable a laptop’s keyboard

1) Damaged keyboard

A damaged laptop keyboard is a real pain in the neck. It randomly presses keys and halts issues. It can make your system to restart or behave strangely.

This can undo you all work with just one press, and you will have nothing to do to get the things or files back. Until, unless your laptop is repaired it would be advisable to turn off the built-in keyboard’s functionality.

2) Turning off keyboard intentionally

You may like the idea of turning off a keyboard intentionally when you are stepping away from your laptop for security measures.

The practice can be fruitful in your office environment when something is rolling on in your laptop and you do not want some unintentional keystrokes to pause your work.

3) Turning off while watching videos

If you are watching videos with your little one, the chances are, he would love to press the keys to pause or close the video.

These keystrokes can make your experience poor, as you cannot send him to his mom as she might be cooking or doing household chores. The temporary turning off the keyboard will help you have a smooth undisturbed experience.

Now, like its predecessor’s windows, 10 as well do not offer any simple and straightforward way to disable the keyboard. But, disabling keyboard in Windows would not be a big issue, by using third party apps or without using them, one can get the job done.

So, stick with the guide and here we share with you some working method of turning off or disabling the laptop’s keyboard.

Here are the 3 Ways To Disable Laptop Keyboard on Windows 10, Mac and Ubuntu:

  1. Disable keyboard using device manager
  2. Turning off Windows default feature
  3. Using Third-Party Apps

1. Disable keyboard using device manager

On a Windows computer, you access all settings through the device manager. The device manager is a simple and straightforward way to access keyboard settings and disable the keyboards.

The method is not useful for a built-in keyboard; the computers with built-in the keyboard cannot use the method to disable keyboard functionality.

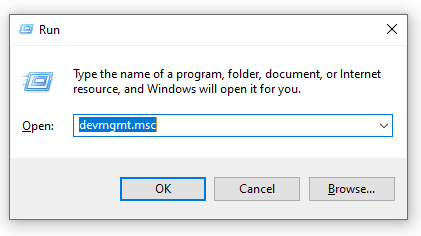
Open the device manager, just press the windows button and search for ‘Device Manager’, you can also search using another method. Press Windows logo key +R to open a run dialogue, and type ‘devmgmt.msc’ into the dialogue and press enter, you will access the device manager direct using the simple command.

open device manager using Windows command

In the device manager, locate the keyboard options and after that double click on the section to expand it. All the keyboards connected to your device for the moment will be displayed in the section, you can go with the keyboard you want to disable, in our case, built-in laptop keyboard.

Now, right-click on the keyboard and you will get many options, click on disable and it will open a dialogue box to confirm whether you actually did it or mistakenly press the key.

Press on confirm, and it will disable your laptop’s functionality. From now on, you will not be able to use your keyboard for these sessions.

You can also go with the uninstall option, the laptop will uninstall the Keyboard’s driver and will make it stop working for the session. Once you do, again the same confirmation box will appear, click on OK, it might ask to provide admin access to carry on operation.

uninstalling laptop keyboard driver

Note: The method will not permanently uninstall or disable your laptops’ keyboard. Once you restart your laptop, Windows will automatically see what changes should be made to make a laptop error-free and install the required windows’ keyboard driver.

Windows will automatically detect and reinstall the driver for the next time and it happens with every restart. The system scans the device manager and looks for the hardware changes necessary.

Another solution

If there is no disable option available on your device manager’s keyboard section. And when you uninstall the driver, the system goes to restart and get the default setting back with no keyboard disabled you need to follow this.

  • Open device manager
  • Select now update drive option
  • This will lead to either go with existing driver or check online, go with existing drivers only.
  • Display incompatible drivers
  • Choose one
  • Restart

Now, the laptop keyboard will be disabled. To get back your computer into the default state

  • Choose compatible drivers
  • Restart

If you want to permanently disable a laptop’s keyboard. You will have to probably go deep; the following method will help you have the job done for a damaged or corrupt keyboard.

2. Turning off Windows default feature

If you want a permanent change, a change where you will not have to worry about the restart will get back the default settings. You will have to turn off windows’ ability to automatically fetch required drivers in the system.

Otherwise, the feature will spring back the keyboard into your life every time you reboot. The process might be lengthy and will require a special focus to get it done.

1) First, go to Start and type ‘gpedit.msc

2) On the left side of the windows screen, you will see a long list of different functions with different files name, do not panic, we need to go in “computer configuration”.

3) Click on the section, it will further expand the section into many; you need to click on “Administrative templates” and then “System”.

Using gpedit Setting to turn off laptop keybaord

4) Head into “Device installation restriction”, with this click you will see many options on the right side. A new tray will open on the right side; the section helps you control the installation of different built-in features or drivers on your computer.

5) You should right-click on “Prevent Installation of Devices not described by other policy settings” and edit the option.

Turning off Windows default feature

6) The option by default is, “Not configured” or “Disabled”, you need to enable the option, and click on Ok to make the changes permanent.

7) Now, you are done, from now one, any intentional change in the hardware settings will not be restored back by the default system.

8) Go back to our device manager method and follow the guide and uninstall the keyboard driver to get the keyboard permanently disabled.

3. Using Third-Party Apps Like KeyFreeze

If you want to see a temporary turn of your windows’ keyboard, you need to use third-party apps. These apps are impressive and you get your desired job done without paying a single penny.

Kyefreeze is a simple yet useful application; it locks your laptop’s keyboard and mouse. The user interface of the application is simple and straightforward.

It offers simple features with one large button if you click the button the timer starts and within five seconds your keyboard will be turned off. Not only the keyboard but a mouse, would no one be able to input using these input devices.

keyfreez App

To get back your keyboard into life, just press “CTRL+ALT+DEL” and the keyboard gets back. The application works fine with all Windows versions and offers a smooth working experience.

You can save your laptop from getting unintentional input when your kids are around and you working on a project or going away from something.

2) Keyboard Lock

A keyboard lock is another exciting application to temporarily turn off keyboard input along with the mouse. The features seem resembled KeyFreeze but the vital difference is, this app offers you password protection and you can disable keyboard and mouse separately or both.

You can disable the keyboard or mouse alone and disable them respectively. All you need to do is put a password and click on the start button. You can unlock the keyboard by just providing the right password.

KeybaordLock App

If you have locked the keyboard and now want to lock mouse as well, simply put the password and press the start-icon again. The application does not affect any other functions, apps or programs.

For instance, if something is played on your computer that will be in the playing mode with zero effect on the running apps. Get the keyboard and mouse again function, by just providing the password.

3) Anti-Shaya

Anti-Shaya is a simple application that protects your laptop from unwanted and unintentional inputs. Though, the original idea of developing this application was to protect the laptop and computers from cats that make changes by climbing on the keyboard and trying to use it for playing music.

Antishaya App

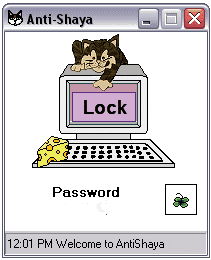
The users can use it for preventing others using the keyboard since it comes with password protection. The application needs no installation, just save it to your computer at any location and execute whenever you want.

The interface of the application is simple rectangular with an uncomplicated, uncrowded layout. You set your password and get the laptop protected from unwanted inputs.

You can edit the password as well by accessing the same layout. The keyboard can be activated by clicking on the application and providing the right password. Be careful, do not forget the password.

4) Kidkeylock

The application Kidkeylock helps you have a protected keyboard from unintentional inputs. The application is password protected and helps disable keyboard, touchpad/mouse.

KidKeyLock App

The best thing about the software is its user-friendliness. You can even choose lock middle mouse button, right mouse, double click and mouse wheel.

Every feature integrated into the software wrapped into a simple screen, you can choose whatever you want by just visiting one simple window.

Set your password and lock keyboard, mouse, and trackpad. With just providing the set password, get the input peripherals back into life.

Disable Laptop Keyboard on Mac

If you are a Mac user and want to disable your laptop’s keyboard, the guide will also help you have the desired thing done without going through big trouble.

The use of tools and tricks on a Mac is difficult to compare to Windows OS, you will have to use some script files. Do not worry, we provide you the script and complete guidelines to get it done.

Using script

You need to open Applications folder on Mac

  • Provide the ‘Utilities’ menu
  • Double-click on the terminal
  • The terminal will be opened, and when it opens you need to put the following script.
  • sudo kextunload /System/Library/Extensions/AppleUSBTopCase.kext/Contents/PlugIns/AppleUSBTCKeyboard.kext/
  • Now press enter
  • To get it enabled, follow the 1-3 points and when the terminal opens to put the following scripts.

/System/Library/Extensions/AppleUSBTopCase.kext/Contents/PlugIns/AppleUSBTCKeyboard.kext

This will disable your laptop’s keyboard and you would not be seeing it functioning again. Yes, after a restart the system will automatically fetch the necessary files and make it enabled.

Using Application

You can find many third-party apps to your Mac laptop keyboard disabled. The mentioned Karabiner app is our tested one and provides impressive service without costing any money.

Disable Mac using Karabiner:

  • Download the application; we have given you a direct download link of the website
  • Search Karabiner-Elements.sparkle-guided in your downloads and open it
  • Drage the file to the application folder, this will install it on your system
  • Open the Karabiner-Elements
  • Type Disable

A new window with the following text will appear ‘Disable internal keyboard while external keyboards are connection’, tick the box and you will get the mac keyboard disabled.

Disable Keyboard on Ubuntu Laptops

Yes, Ubuntu laptop keyboard disabling is a little trickier and needs a bit more skill. You need to identify your laptops’ keyboard ID and manually do it using command.

To find the device’s ID run ‘Xinput-list’ command. This will display all devices connected to your Ubuntu laptops with their codes. You need to check your keyboard and read its code to disable it.

You need to run the following code with your device ID as well mentioned.

  • xinput set-int prop [ID] “Device Enabled” 8 0

To enable the keyboard again run the following commands.

  • xinput set-int prop [ID] “Device Enabled” 8 1

You will get the laptop keyboard back into working.

Get your keyboard repaired

Other than the solutions we mentioned, if your keyboard is damaged or broken, you should repair that. The use of an external keyboard would not be a long-term solution.

A laptop is meant to be portable, if you have to carry around an external keyboard and mouse along, the portability section vanishes. So, as quickly as you raise your budget gets it repaired. If you do not pay heed to this, the problem can be bigger than just this.

As the keyboard is connected to the motherboard, there are possibilities that the damage can affect other vital hardware components attached.

Conclusions

We mentioned more than one solution for your Windows, Mac and Ubuntu laptop. Hope the solutions will make your computing life easier than before.

Be it, cats, clueless family, or a friend that accidentally clicks your laptop’s keyboard, the locking keyboard can be useful.

When you have your tools in place, you can have a sigh of relief that the keys will remain locked no matter how hard your little one tries.

Laptop Specifications List : 10 Most Important Things To Check

Laptop Specifications List

A laptop is one of the basic necessities in today’s life. It has become the center of attention, and we cannot survive without a quality laptop, irrespective of profession, qualification, and age.

Purchasing a brand new quality laptop costs arms and legs. You cannot afford to have a laptop that does not have a right screen, keyboard, or other vital configurations.

Laptops are portable, that’s the only thing that makes them superior compare to desktop. Even at the time where technological transitions have reshaped everything including computers, you cannot compare the power of a desktop with a laptop.

One more thing, they are less flexible compared to the desktop. Once you chose to have a laptop and purchased it, that’s it you cannot upgrade, any of the features except RAM and Storage, this feature even comes in the latest premium laptops.

For the reason, you should be very careful and clear about what you actually want to buy. Do you want to have a laptop for gaming? Or scouring for something that helps you in studies and other regular computing tasks?

It would be ideal to pen down all the features that you want to see in a laptop.  After that, start gazing at the top machines under your price bracket.

Laptops Requirements Table 

Specs Minimum Recommended
Processor i5 i7
Ram 4GB DDR4 8GB DDR4
SSD 128GB 256GB
Graphics MX 150 GTX 1660
Display 13 Inches 15 Inches
Resolution 1366 x 768 1920 x 1080
Battery 5 Plus Hours 8 to 12 Hour

Here’s the list of 10 most important laptop specifications you must look:

  1. Latest Gen Processor
  2. DDR4 RAM
  3. SSD Drive
  4. USB Type-C / Thunderbolt 3 Ports
  5. Dedicated Graphics Card
  6. Decent Battery Time
  7. Infrared Camera
  8. 2-in-1 PCs
  9. Display and Screen Resolution
  10. Portability

1. Latest Gen Processor

Latest Gen ProcessorThe brain of a computer, the most important thing to look into a computer is of course none other than “CPU”.

That’s the part of a computer that decides the speed of processing, no matter what you are going to do with your system. The part comes into play in every processing, such as editing docs, watching movies, browsing, playing games, running apps like Autodesk and much more.

So, the simple rule of thumb in the processor side, try to grab the latest generation processor. The latest processor is faster, quick and produces fewer heats compare to old architected processors.

If you do lots of browsing and indulge in web surfing more than usual, you should go with a dual-core processor. The processor generation helps you open more than one tabs and aids in browsing. They are best for multitasking and even ease down your work when you have to do heavy processing such as photo-editing, gaming, and others.

If you want the fastest processing, like things, processed and presented on the screens in milliseconds, go with Core i7, or Core i5. These processors are good at processing commands to fast, and you will have skyrocketing processing speed in multimedia tasks.

Some latest manufactured machines are coming incorporated with Intel i9 processors. The processor would be much faster than previous but dissipate heat with respect to the processing.

2. DDR4 RAM

DDR4 RAMRandom Access Memory (RAM) helps computer approach running programs quickly. The higher the RAM size, the more playground will your computer have to run different programs. In the old days, when entertainment did not hit the computer world to this extent, 4GB would be enough to take on operations.

But now, even 16GB seems less and sometimes while playing the latest titles, the user finds it hard to quickly access things as millions of instructions are coming, it becomes hard to run them all.

One more important thing, look at the type of RAM your computer integrates with. Though DDR3 RAM is not being used in laptops, still have a view and see if the computer is incorporated with the latest DDR4 RAM. The DDR4 is the latest RAM type and you will see a dramatic difference in performance.

If you are a casual user, use a computer to carry out simple operations such as browsing, typing, playing old PC games; 8GB would be more than enough. If you are an avid gamer, a power user, who uses to carry out bulk operations, having a 16GB would be preferable.

3. SSD Drive

SSD DriveOne of the key features you should look into a laptop these days, whether the system holds an SSD drive or not. The latest type of storage (SSD) is way quicker and faster than traditional hard that once you start using one, you will be addicted to it.

The traditional drives are becoming obsolete, even casual users prefer to opt with flash storage as they offer quick app launch time, booting time, enhanced data operation speeds.

The traditional HDDs are slower, as they got the moving parts and would not fit the needs in today’s time. Yes, SSDs are expensive; you can get a 1TB HDD in return of a 128GB SSD. So, if you are very tight on budget and need more storage, you can have an HDD.

4. USB Type-C / Thunderbolt 3 Ports

USB Type-C / Thunderbolt 3 PortsA laptop is a compact device comes with limited room around its base for ports compare to their elder brother desktops. So, you need to be very careful while choosing one with respect to your needs.

Like, if you are a professional IT service provider and need to connect printer, mouse and a USB to your laptop, it would be ideal to look out a number of USB ports. Not only USB type but the generation of the USB ports come with the computer.

In today’s time, USB 3.1 is the most used and advanced for connecting external drives. Though USB Type-C has changed the entire concept of connecting a device to the computer as with it you can charge your laptop with the c-type cable. The USB type c is a reversible port, with the most modern technology inherited.

Other than USB Type-C, you should also check for Thunderbolt 3. The type of connectivity comes with the fastest bandwidth and lets you plug in 4k monitor and other graphics. If your computer supports thunderbolt 3 ports there will be a lighting icon beside.

5. Dedicated Graphics Card

Dedicated Graphics CardFor the people who want to play games or edit videos or run heavy apps, another feature that should be on the checklist is whether the system houses a discrete or integrated graphics card.

The main difference between an integrated and a dedicated graphics card is, the former relies mainly on computer’s random access memory to sort-out visual instructions while the latter comes with its system to nail visual processing.

For playing high-ended video games, a dedicated graphics card is a must-have feature. Yes, they come at a price and costs arms and legs. If you are an avid gamer you would know the cost and importance of a graphics card.

The most famous graphics cards are of NVidia GPU. They are the best and help you ease down visual processing and aids in playing video games.

6. Battery Life

Battery life is an important thing to look into a laptop. In fact, in these days, one of the most prominent features people pay special heed to is battery runtime.

Along with the weight and size, people love to grab a decent battery life holding laptop. It helps you carry out your operations in the middle of somewhere. It is not always possible to get a seat near a power socket on a train or even a cafe.

A small and light laptop generally offers an extended battery runtime compared to larger models. The battery life of a laptop is directly connected to your type of workload. If you are a gamer and indulge in heavy gaming, your battery consumption will be more than casual computing or browsing.

It would be advised to read reviews of a laptop’s battery life and do not go with the brand’s claims. The battery life of a 15-inch laptop should fall around 10-hours, that’s called a good battery life. A laptop with near fours battery life is bad and you must opt with something better than this.

7. Infrared Camera

Infrared Camera for windows helloWindows operating system is taken as the world’s most secure OS. The majority of the population around the world runs Windows OS and there are reasons for that. The OS is simple in use and offers arrays of features that help the masses to get their issues solved.

Take Windows’ hello feature as an example’ you can open your computer by just looking at the screen. You do not have to put your password or a pin; look closely at the computer’s camera and that’s it.

The feature is workable only if your system secures an infrared camera or a real sense 3D camera. Many top-notch laptop brands incorporate their computers with the type of camera and help you get instant access to your desktop.

8. 2 in 1 laptop

2 in 1 laptopThough old PC and laptop users do not like 2 in 1 convertible laptop, the fact is, the type of computers are getting fame. They are easy to use, can be taken around due to less weight, can be used as a tab and full-fledged laptop and much more in the row.

But, you need to find out whether or not the types of laptops are your cup of tea. For instance, if you are a hard-core user, who use to carry out bulky computer operations, the 2 in 1 convertible would do no good for you. They cannot take bulky loads, rather simple operations.

For a casual user who needs something operation to be carried out, a student who needs to take instant notes, or study in groups or an artist who wants to craft something on the pixel sensor screen; the laptop is ideal to go with. So, it is upon you what you need, do not just go with the looks or easy of operations.

9. Display and Screen Resolution

Screen size plays a huge role in your computing life. It depends on your work requirements and budget. There is no best laptop screen size, it is different with different people and work needs.

A 17-inches screen would be great for work and gaming. It would come with a bigger chassis and decent sized keyboard and make your typing easier, would be far bigger and heavier than 13-inches, cumbersome to carry around.

A 15-inch screen is considered ideal for everyone. You can have it for gaming, casual computing, and office work. Other than screen size, it displays is something one pays heed to.

For instance, if a laptop comes with a decent wide viewing angle, offers perfect refresh rates, anti-glare coating, and IPS panels that would be good for your eyes and enhances overall display experience. On a screen integrated with the mentioned bells and whistles, you will have a crispier, clearer and smooth watching experience, binge-watching Netflix series.

Another factor that comes into play when discussing display is the screen’s resolution. Older laptops often integrate with the screen that offers a muddy 1366 x 768 screen resolution.

For gaming, even for casual watching, the resolution is granny and makes overall experience spoilt. With a 1920 x 1080 screen resolution, a user experience smoother and easier experience to watch something on the screen.

10. Portability

One of the most significant things that play a huge role in shopping for a laptop is portability. If you are a frequent traveler who moves from one location to the other for business or personal, you need to go with something lighter.

The 17-inches screen sized laptop is bulkier and would add difficult in carrying around. The 15-inches screen laptop is lighter compared to 17, but you need to read reviews or check specs to see the weight of the machine. For someone looking ultra-portable laptop, opting with 12-inches laptops would be a nicer option.

Guru’s Verdict

Buying a quality laptop in accordance with the need is difficult. If you are tight on budget, the hunt can even be trickier. If you keep these things in mind and gauge every product with respect to these features, hopefully, you will have a better and latest laptop as per your purpose.

Prior to purchasing a laptop, you should make a specification list or you can say features you want to look in your machine. After that, go with your budget and compare the different models to see what falls right.

How To Use Laptop As a Monitor (Extended Display)

How To Use Laptop As Monitor

Did you just get to know that you can use your laptop as a monitor for your PC?

Yes“, you can use your laptop as a second monitor for your PC. There can be any reason to want your laptop to perform double duty as a second screen to the computer.

Well, it is really easy to imagine doing this, but when you actually try to roll hands on it, you get to know that it is easy said than done.

You might take it simple, just connecting your laptop to a desktop using an HDMI cable. The HDMI cable or display port that you are connecting your laptop and monitor with can only work for displaying a laptop screen on the desktop monitor or any other external device.

In simple words, connecting a VGA port, DVI port, HDMI port or display port, from your laptop to desktop can help you have the laptop screen shared on the PC, not vice versa.

To use a laptop as a secondary or third display to function as a monitor, you need to go deeper than just this. You will have to use various Windows features or some software.

Yes, I can find dozens of such software that can help you do this as easily as you can think of. In this guide, I am going to reveal the simplest and most useful way to use your laptop as a monitor for extended display.

Without further ado, let’s get started.

Reasons why you need to use your laptop as a second monitor?

As we are intended to use a laptop as an external monitor, the question arises here, why would we do that?

I mean, we got a super-fast system that is useful to operate dozens of programs simultaneously, why would we feel the need to use a laptop as a monitor for the desktop.

Let’s try to explore different areas, and try to figure out the reasons behind this.

1) You can use multiple programs and software simultaneously

Yes, that is also considered the reason why people try to do that. It visually looks stunning when you know that you can drag any file from one system to the other without connecting any pen drive.

But, that is more for those who work on more than one project. It would be easier for them to use one PC for one project and the other screen for another and share anything in between without any hiccup.

For example, a graphics designer who uses two systems; one pc and laptop, he will have files on his laptop as well as on a PC. When in-home, if he is using a computer, this type of connecting can help him fetch any document from the laptop.

So, it is handy to have your other system in access.

2) It increases productivity

Yes, having more than one section at your disposal enhances your productivity and help you go as smoothly as you can. It will make your workflow faster, and you enjoy working in your office.

It is also helpful for security reasons. If you do not want to install some apps or software on your laptop, install those on your computer, and share screens on a laptop and get the job done.

3) Sharing data across the platform

For organizations and digital marketers, it is imperative to have such a connection. It will bring huge benefits in the long-run for sure. It will be easier for them to share data, stats, performance, updates from one device to the other.

Things you will need to achieve your setup

Remember that, we are going to turn a laptop into a monitor. So, it is not necessary that every component on our laptop be in perfect working conditions. Even if you do not have access to some features, a laptop with just a display can fill the bill.

The method we are sharing here only works for Windows to Windows-based systems. If you are using a macOS on either of the systems, you will have to follow a different pattern.

The things you need include

  1. A working computer with Windows OS installed
  2. A laptop to use a second monitor or screen
  3. And latest Windows 10 installed on both systems

If you have the latest Windows 10 installed, in actuality, you do not have to use any cord or cables to get the job done. Windows 10 has some amazing built-in features that help you connect a PC to a laptop as easily as possible.

Use Laptop As a Monitor! Here Are The 3 Ways

In this guide, I am going to narrate more than one method to use a laptop as a monitor for a PC. The method will range from using built-in windows 10 features to streaming games using a stream.

  1. Using Miracast on Windows
  2. Using Third-Party Apps (Space Desk)
  3. Using Stream In-house Streaming

1) Using Miracast on Windows

Miracast is a built-in Windows 10 feature. This feature helps us to get the desired job done. But, before getting the right use of this feature, we need to set it up. So, follow the mentioned steps to set up a laptop that you want to use as a secondary display.

Steps to follow for a laptop as a secondary display

1) Click on the start menu and find ‘settings’ and get into it.

2) In settings, you will see the system icon, click it and open.

3) Now, click ‘Projecting to this PC’, on the bottom of the left menu

4) And the first drop-down menu should be set to available, which means, allowing other devices to project onto it.

That’s the only settings you need to have on your laptop that you are going to use as a second monitor.

Settings on the main PC what you want to use to display screen on a laptop

Remember, here as well, the operating system should be the latest and updated windows 10.

1) Click on the notification center in the bottom right-hand side of the taskbar

2) Select ‘Connect’ button the notification tab

3) Your PC will be looking for the devices to project onto the screen. When you see your laptop is available there, select it.

4) Now, if you select it, on your laptop you need to go back and accept that

5) Get back on the main PC, right-click on the desktop, and select the ‘Display Settings’

6) And inside the display menu, make sure that ‘Multiple displays’ has a setting to ‘Extend desktop to this display’

Now, you are ready to embark on a new journey. Simply drag and drop your desktop icon on your new screen and enjoy the freedom of using two devices.

2) Use Third-Party Program (Space Desk)

I do not think so that, you would need a third-party tool when you have Miracast features in Windows 10. Yes, you might get the settings right, or due to unknown reasons, this may not work for you. So, it is always a good idea to have a second or third option onboard.

The third-party application name is Space Desk, a popular name to display your computer screen on a laptop.

System Requirement

Yes, here as well, we need to have a proper setting. The settings would be for primary PC as well as on secondary monitor laptop.

Primary PC Settings

Keep in mind, this method can go if you have Windows 10 or later versions installed like 8.1, and 7.

  • Windows 10,8.1,7
  • Adapter such as NVidia/AMD/Intel
  • WDDM 2.6/2.5/2.4/2.3/2.2/2.1/2.0/1.3/1.2/1.1
  • DirectX 10

For Laptop as a Secondary Monitor

  • Windows installed like 8.1, and 7.
  • DirectX 10
  • DirectX WARP

Now, when you have proper settings for the laptop as a secondary screen and PC for the primary device, you need to download the software from the official website. Here, you will have to download separate software for laptops and PC.

  • So, download Space desk for a secondary machine
  • And download Space desk for a primary machine

The software is also available for iPhone and iPad users. So, in other words, you can connect these devices to your PC as well.

1) Now, follow the mentioned steps to get the right setting on your main PC and Laptop.

2) Install the mentioned software versions on your laptop and computer and restart both systems.

3) Both systems should be connected to the same internet connection

4) Now, go to your laptop and launch the Space desk viewer

5) The laptop will automatically detect your primary computer on the list.

6) Recognize the system and click to connect

Hopefully, you will be connected to your primary PC. If you have no access to the internet, and in case your PC is not listed, you can follow a different method.

1) Just go to this link (http://spacedesk.ph/html5viewer/)

2) You will need to input the IP address of your primary device in our case PC

3) You can get the help of Space Desk to learn the IP address. Just launch the app on your primary PC and you will see the address right there.

4) Copy the address and passed it on your laptop and connect

Now your laptop can be used as a external monitor. You can follow any of the two steps to get the job done.

Team Viewer

Third-party software to have a display of our laptop on a PC is using ‘TeamViewer’. Yes, it is different than other methods, but the ultimate goal is to have the desktop screen on our laptop.

Here, our PC will have the entire control of the laptop. So, let’s follow this method and see how this method is helpful in doing our job.

  • Visit the team viewer official website and download on both systems
  • Install it on both
  • Get the TeamViewer ID for your desktop
  • Open the software on your laptop and put that ID
  • It will ask for a desktop password, provide and hit log in

Now, you will be able to control your desktop from a laptop

3) Stream Games using stream In-House Streaming

Long gone are the days when we had to use a powerful PC to run steam games. You can use your laptop to play steam games from your home PC using steam’s In-Home streaming option.

This is helpful if you wish to play games on your bed, as you are not permitted to use your desktop or PC in another room. Or, you can play games in your office, and your powerful PC is at home.

The advantage of this feature is that, even if your laptop is not that powerful compare to PC, still you can play games. For instance, if I have an old laptop that I casually use for doing office stuff, and I can still play my high-ended games using that laptop in my office.

Follow me to get this amazing thing on run.

  • Open a steam account using your laptop and desktop, the account should be the same.
  • From your laptop, click on the game you want to play
  • And do not hit the play button but hit the ‘stream’ button
  • And now hit the stream

Now, your laptop will be streaming the game from your home computer. And you can control the game as you would do using your PC.

This method comes with some downsides. Yes, if you are an avid gamer and play in multiplayer mode, you might have to face the latency issue.

Few tips to achieve the best result

If you are a novice and had never used your laptop as a second monitor for your PC, I would recommend opting for the second method. There is a reason for that; the first method shows many problems.

A while penning down this post, I came across many people commenting that they do not get the connection. There are reasons for that.

1) The Miracast method only works if you have Intel HD graphics. It would not work with you if integrated graphics card. So, it might not go smoothly if you have dedicated graphics.

2) In the first Miracast method, you need to use the wireless connection to use on both systems. If you have an Ethernet connection, the process might not go smoothly for you.

So, my suggestion would be to go with the second method, it might require a few more steps and work, but it will be good for you in the long-run.

Is it also working on windows 7 or 8?

Our first Miracast method to connect a laptop as an extended display for a PC is not workable if you have windows 7 or 8 on either of the system. You need to have windows 10 latest and upgraded version to get the Miracast feature going. Yes, that’s the best method, easy as well.

Yes, the third-party application method or TeamViewer will work fine. Just follow the mentioned guideline and get the job done.

Is this instruction also helpful for Mac Users?

Our firsts method, Miracast is only limited to Windows users. You cannot connect a Mac device following the method to a primary computer. Yes, the other methods such as Space Desk or Team viewer along with the streaming can be used to take a Mac device onboard.

I have mentioned the complete process, in case of Space desk, get the Mac version of the Space desk viewer and connect it to your mac laptop. Keep in mind, Space Desk is not the only third-party software that is used to connect and share screens. There are others, just hit Google and browse for many methods.

Can you also use the laptop as a monitor for ps4?

Yes, you can use your laptop as a monitor for PS4 games. But, there would be an entirely different scenario in this case. It would be different than sharing a laptop screen on a PC by following the mentioned method. Here, we got PS4 and we wanted to use our laptop to act as a TV or LCD screen.

You use your laptop as a monitor for PS4 when you see your TV screen is already taken out by someone else or your TV is out for repairs. By using your laptop as a monitor you can play any game as you would play using a TV Screen.

How To Play Xbox One Games on Laptop – Everything You Need To Know

how to play xbox one on laptop

You are an avid gamer, your smart TV is being used by your spouse and you cannot just ask him/her to get off from my TV. And you still want to play your favorite Xbox one games, what is the solution?

That’s right;

Gaming for gamers is more like food, being away from your console is tough and stressful.  Other gaming consoles such as PlayStation and Wii adorns an earthshattering feature that allows the users to run gaming device games on a computer or laptop.

But, Windows after advertising the features for a long time recently released this incredible function. Now, you can play your Xbox One games on your PC as long as you are on the same network.

Windows 10 and Xbox One are Windows product and the feature has long been touted and fortunately now available to make you play games together on PC and Xbox One.

This means, now you can stream your Xbox One games such as Halo: The Master Chief Collection, Forza Horizon 2 to a PC or Windows running tablet.

So, from now you can stream your Xbox games on your PC, get some fresh air and put your laptop in your lap and play your favorite game in a fresh environment.

Let’s elaborate on how the feature functions, and what other things are required to do so.

What is Xbox game streaming?

The game streaming is referred to as two types of streaming. The first is live streaming video games to YouTube or Twitch platform. The other type is, streaming from the gaming device to a laptop, and both the devices should be connected to the same network.

The purpose and meaning of the feature are, you could play your favorite video games without moving your gaming device and entire setup. This type of streaming turns your laptop or PC into a remote display for the gaming device.

By turning the feature on you can play your Xbox One game on your PC, watch your favorite movies or play games on a Windows 10 tablet, if it supports and withstands the graphics equaling to your gaming device.

So, now no, without physically moving your gaming device you can play your favorite games, as long as your entire set up is hooked to the same network and internet speed should be enough fast to support the stream.

Both the devices should be connected to the same router, with an Ethernet cable or Wi-Fi connection. Though the Ethernet cable is considered best for streaming high-ended video games, when you are looking for an ease to move your laptop to any location in your home, wireless could do the job.

Related: Connect Nintendo Switch To Laptop

1) System requirements to play Xbox One games on a laptop

To take benefits of the streaming you need to have the following requirements fulfilled.

  1. Xbox one console
  2. Game streaming enabled in Xbox One
  3. Network connectivity (Your gaming device and laptop should be connected on the same network)
  4. Wired or Ethernet connection is recommended for smoother data transfer

2) Windows 10 PC requirements

To run Xbox One games on your PC you need to have

  1. 2GB RAM
  2. 5 GHz CPU
  3. Good performance wireless – 5 GHz
  4. Limited performance wireless – 2.4 GHz

3) The Xbox One Application

Xbox One Application On wondows 10

The Xbox application has done wonders to the PC gamers. The gamers can do pretty much of activities that were merely limited to the gaming consoles before. The application has become an integral part of Windows 10 and most of the gamers are aware of this awesome integration and get the right use of it.

The application allows you to control your XBOX live account using Windows PC. The application lets a gamer join parties using PC and talk to Xbox one comrades. Using the Windows App you can experience cross-platform multiplayer for the supported games.

The application works as a remote control for your Xbox one device. The feature such as the ability to connect from your Xbox One to a PC anywhere in the world is amazing, as long as you have an active Wi-Fi connection. Though to enable the feature you need to have a digital copy of your favorite games.

Let’s move forward and see how the feature works and make you play your favorite games on PC.

How to play Xbox One games on your laptop

Imagine you are about to play a video game on your Xbox one gaming device and someone enters into the living room and demands the TV.

Every set was on, and you are hooked up and about to process the gaming. The TV is really important to the show and you need to follow the mentioned setting to kick start your gaming on your PC

1) Check if game streaming is enabled on Xbox One?

Check if the game streaming is enabled on the Xbox One gaming device. To do this, access settings-> preference and make sure that “Allow game streaming to the other device” option is checked off. If not, then check this radio button to turn your computer into a remote device.

Enabling Game Stream

2) Check if your Xbox One and PC are connected to the same router?

The streaming will only take place if your Xbox One game console and the gaming PC are connected to the same router. One more thing, the feature is usable in Windows 10 operating system; the feature would not take Mac or other OS in. Your both systems should be connected to the same Wi-Fi network.

Connecting with Same Router

3) Plug Xbox One controller into your laptop or computer?

Your TV screen is occupied, or you just want to experience the game on your green lawn. To continue your Xbox game onto a PC you still require your game controller.

Plug your Xbox One controller into your computer. This will install the required controller drivers on your computer. Once the controller vibrates, you are good to go, ready to use the laptop.

Keep in mind; you still need to be hooked up while you play the Xbox One games. You can use an Xbox 360 controller to stream your favorite game on Windows 10 PC.

4) Launch Xbox One App on Your Windows 10 PC

The app comes built into the Windows 10 operating system. If you have installed Windows 10 you can use this application, and you must sign with the same Microsoft account on both Xbox One and Windows 10.

You can open this application from the account or can open it from the start menu or search it in the command bar. If you follow all of the guidelines, you will have the app working fine.

After that, sign in to your Microsoft account, when it opens to do so. Once you are signed in, click the menu button on the left side of the Xbox one application window. It will open a list of different items; you click on connection, near the bottom of the list.

Now click on add a device, in the top-middle section of the app windows. The app will start search Xbox One console in your network.

Now, when the app searches the device and shows it, click the Xbox One and connect it.

If you see the application has not searched anything, you can use the other option such as adding the IP address in the given field. You need to find the Xbox One IP address. The address can be found by opening up the setting menu then click on Network -> Network settings -> advanced setting.

If you have reached up to this, and your console is connected, it will show up under the ‘Now Playing’ Section in the Xbox One app. Click it and you will see a direct feed on your PC from the Xbox One.

Remember

Here you need to note down one thing, all gaming devices are pre-named ‘MyXboxOne’, If you are using more than one consoles on one account, you should rename the console name so that you could correctly identify the console that you want to connect. You can rename it by visiting the Setting of your console than System–> console name.

5) Video Quality

High Quality Video

Streaming Xbox one games come with some limitations. Generally, the process only works for games, not for the content. Simply, as per Windows, you cannot broadcast content from streaming applications.

Depending on your Wireless set up speed, your PC’s video quality can be adjusted. By default, the Xbox One streams video games on a Windows 10 with the medium video quality. This is described by Microsoft as the video quality is achieved when 5GHz wireless networks with PC and consoles in different rooms.

Related: Optimized Windows 10 For Gaming

You can improve the video quality if both the systems are hardwired under the same network or worsen the experience if you have a low-end computer with an old Wi-Fi device installed.

6) Playing Xbox games anywhere

You can play your Xbox games on a PC anywhere with some sort of limitations. The feature was launched in 2016 that enables the Xbox owners to play Xbox games anywhere around the world on a Windows PC.

For this, you need to have a digital copy of the game you wish to play. And the process will allow one person to be signed in to your Microsoft account at a time, you would not be able to play games on each device.

The Xbox Play Anywhere feature works best for Xbox Play Anywhere titles. The titles are as follows; Halo Wars 2, Gears of Wars, ReCore and Forza Horizon 3. The problem is, there are not too many titles on the name, and you just access a few games that have been mentioned.

So, let’s move towards how we can achieve this.

First, you need to check if your Xbox One and PC Windows are updated recently. You would not be able to play games using the feature if Windows 10 anniversary updates are not there. These updates are required, check for the latest updates in case you have not installed recent ones.

Open the Xbox one app and log into your Xbox Microsoft account. From here you will see the Xbox Play Anywhere titles that are ready to be downloaded and streamed.

If you have not purchased those games, you can purchase and add them. The titles would not be available for streaming if you have not purchased them.

You need to be connected to Wi-Fi in order to install and transfer those games. The last thing is just connecting the controller through PC’s USB port and enjoys the games on your PC.

7) Fix network errors

As you are going to play Xbox one game on your PC, there can be some lag or network errors on your Wi-Fi speeds.

The first advice is, it would be better if you connect your system using Ethernet cable. The Ethernet cables work fine compare to Wi-Fi and provide smooth data transfer to make you run the latest games.

You can also use the Xbox Console companion app to fix the tweaks of the streaming, this will add up to a faster-moving picture, at the expense of image quality.

You can switch to different settings as per your usage and preference. Such as if you want to look at the granular details on the stream, like end-to-end latency, bandwidth use click on the button that appears on the bottom left corner of the Window.

Conclusion

I hope you like the guide and by following the points you will connect your PC to Xbox One gaming console.

You may face errors while doing that, the errors could be due to more than one reasons. If you follow this post, hope you will not see any error and get the things done without any big hiccup.

Why My Laptop Screen is Black? Here Are The Possible Reasons

Laptop Screen is Black

I hope you are are in here searching for why my laptop’s screen is black. Here is the truth, laptops are crucial to us as we rely on them for our work and studies. Even if we take care of them daily to improve their average lifespan still they break down due to accidental hardware failure.

When this happens, usually our work gets delayed and we lag behind. Most of the problems you would come across both software or hardware related can be easily understood and then be dealt with since either your OS or the BIOS will detect what’s wrong and indicate what part is malfunctioning.

Sometimes, however, you can not access the OS or BIOS at all; the laptop’s screen refuses to give any output and stays black even when the laptop is powered on. This is quite frustrating as unlike most other problems you would run into, there is no interface that will help you troubleshoot and diagnose what befell that poor laptop.

In the following case, there are several things either one of which could be at fault here. To diagnose the laptop’s screen we will tamper several settings of the laptop manually. Doing so will help us determine the reason why your laptop’s screen is black and we might be able to suggest solutions as required. So without further ado, here are the 8 reasons why your laptop’s screen is black:

  • Check your brightness levels
  • Laptop Overheating
  • Disconnecting all the Peripherals
  • Fixing issues in Operating System
  • Faulty BIOS Installation
  • Performing a hard reset on the laptop
  • Issues detecting display
  • Hardware issues

8 Reasons Why Your Laptop Screen is Black

1. Check Your Brightness Levels

Before you proceed with all these diagnostic procedures, make sure its not just your brightness levels that are making the screen appear dark. Ramp up your brightness levels and check if it fixes the “problem”.

2. Laptop Overheating

If your laptop overheats during the start-up or while you are using it, and stops giving display, this could imply several things:-

  • The laptop needs to be cleaned from inside.
  • The surface you are putting the laptop on does not allow proper airflow.
  • The workload is overwhelming the CPU.
  • There is too much graphics load for the laptop’s GPU to handle.

First and foremost, if you use your laptop daily, you should make sure that you keep it in a pristine condition. Make sure that you use it in a dust-free environment and use a blower, designed for cleaning PC, from a distance to clean dust once in a while.

Use the laptop on a hard, flat surface that doesn’t block the airflow from the side vents.

It doesn’t happen often but if your CPU usage causes the laptop screen to turn off, you might want to scan for malware or any unnecessary background programs that could be causing this. If your PC is clean and it’s your work that is the only factor in causing the overwhelming workload, it might be time to upgrade your machine.

If you play games on your laptop or use software that has immense GPU consumption and it stops giving display after a session of either, it may be that the software or those games have higher system requirements. It might be time to upgrade your laptop if you want to continue playing those games or using that software.

If your laptop has the minimum recommended system requirements or just stops giving display randomly, if it’s not the CPU that is being overwhelmed, then this could probably be the result of the GPU shutting down. Some laptops have two graphics options, a dedicated GPU and the integrated GPU. You can disable the dedicated GPU in the BIOS.

3. Disconnecting All the Peripherals

Often many PC hardware related problems, including ones relating to visual output, can be fixed by just manually removing and plugging them in. Even if this doesn’t fix your issue, it might help you understand what part of your laptop is faulty and, hence, causing the screen to remain black.

Start by removing any external devices you have connected with your laptop. Of course, some of them, like your mouse , gamepad or external HDD, might not be the basis of the problem but disconnecting them will ensure that you can get down to the basic issue.

The devices that are causing your screen to remain black might be the ones connected to the VGA, DVI, HDMI or Thunderbolt ports. Disconnect all these devices and restart your computer.

If the problem is resolved, it’s more than likely that one or multiple of those peripherals were causing the problem. Reconnect them one at a time and you will figure out the device causing the issue. Later, you can search for a fix or replace it if it’s broken.

4. Fixing Issues in Operating System

Your operating system might not be the root of it probably, but it doesn’t hurt to check if it is the one causing the problem? If your computer boots up, the BIOS is displayed and the screen stops displaying when the OS starts, there might be a problem with your VGA drivers or there might be a file that is missing from the Windows directory.

If it is due to a VGA driver and it occurred recently, it could be because of a driver update. In that case, you might want to roll back the installation. By plugging out your PC several times during the OS boot-up process, you might be able to access the system recovery option which could be the solution for your black screen.

If this doesn’t work, you can do a fresh installation of windows. This will fix the problem if it is OS related.

5. Faulty BIOS Installation

The screen not being displayed could also be the result of a failure of a BIOS update. To undo this, you will have to consult your laptop’s manual as each laptop’s motherboard has different settings.

For HP laptops you can go through the following steps:

  • Turn off your laptop
  • Ensure it’s connected to a power source and hold the following key combo Windows key + B. While still pressing the following combo, press the power button for one second.
  • After a number of beeps, a BIOS update screen will appear. Continue with the BIOS update

For Dell laptops follow these steps:

  • Turn off your laptop
  • Press this key combo Ctrl key + Esc key and connect the laptop an AC adapter.
  • Let go off the keys when you see the BIOS screen.
  • Disable the ‘Reset NVRAM’ option (if available) and proceed with the ‘Recover BIOS’.

6. Performing a Hard Reset on the Laptop

Haven’t figured out the issue yet? Hard resetting the laptop might help. To hard reset the laptop follows these steps:

  • Unplug any power source and remove the battery. Disconnect all the external devices and peripherals.
  • Press and hold the power button for about several seconds. Let go after a while, connect to a power source and put the battery back.
  • Turn the laptop on and select “Start Windows Normally” when a startup menu appears.

7. Issues Detecting Display

If the laptop screen doesn’t give any output signal, it could be that there is no other issue but the LCD has been damaged. To test this, connect your laptop to another LCD monitor via an HDMI, DVI or a VGA port (depending on the availability of the port and cable).

The connected monitor giving any output would imply that either the LCD has a bad inverter, a bad backlight or the LCD has gone bad. If the laptop is still under warranty, you can contact the laptop manufacturer. Otherwise, the laptop will require a service from a repair lab.

8. Hardware Issues

If the computer screen refuses to give any display at all then it is probably your graphics card, a memory module, the CMOS battery or the board itself is causing this inconvenience.

In some motherboards, there is a beep code system. Everything from your PSU (power supply unit) to a misplaced CMOS battery has a beep code. These beep codes can be distinguished by the number of beeps and the interval between the subsequent beeps.

This is really useful if there is no display. If you can hear beeps from your motherboard, search online with the brand name of your laptop for the number of beeps you are receiving. This will immediately help you determine what part of your laptop is malfunctioning and you can then replace the faulty part.

If your laptop is not giving out any beep code then you can reseat the memory modules. Before you do this, make sure you remove the battery. Remove all the memory modules and clean them.

Then put back one of the RAM modules and start your laptop similarly, if your screen is giving a display then there’s a problem with your memory modules. Repeat this for other one(s), till you figure out the one causing the problem.

If memory modules are not causing this problem, the issue could be related to the power supply or the motherboard being damaged. Unfortunately, if either of those are causing the problem, there are not many ways to affirm it by yourself and you will have to take it to a repair lab.

Conclusion

Needless to say, whether you have it for casual use or for professional use, you should always take care of your laptops. Always use your laptop on a hard, flat surface and ensure that the airflow vents are not blocked. If your laptop still heats up during use, get a laptop cooler.

When turning it off make sure that you put the lid down gently. Avoid running applications that require higher system specifications than what your laptop has. Read your laptop’s manual before updating your BIOS. Remember a little care can go a long way!

How To Connect Laptop To Vizio Smart TV Wirelessly

how to connect laptop to vizio smart tv wirelessly

When it comes to streaming your favorite TV series or movies on a screen, bigger is always better. Smart TVs offer not only that, but the sound system featured in them is far superior to the speakers of any of your mobile devices.

Movie nights with your friends (or your significant other!) are obviously more fun when you are watching on a wider screen.

If you like playing games with your friends or family on the weekend, there is all the more reason to connect your laptop to a Smart TV now, since playing local multiplayer or co-op with your buddies is so much better with on a wider screen.

One of the most popular brands of Smart TVs is Vizio and for several reasons. In this article, we will discuss why you should get a Vizio TV and how you can connect it wirelessly to a laptop/PC.

5 Ways To Connect a Laptop To Vizio Smart TV Wirelessly

There are several ways you can connect to your Smart TV including wired alternatives but if you are going to be enjoying your movies or games while sitting on a couch or on a bed, wiring is going to be quite an inconvenience.

Thus we have assembled 5 most reliable and easy to install ways to connect your laptop to your Vizio Smart TV wirelessly. So without wasting any time, let’s get to dive into it.

1. Connect Using Chromecast

Connect Using Chromecast

Google has a bunch of useful and impressive devices in its arsenal and Chromecast is no exception. This device weighs around 1.14 Ounces (depending on the version) and can be connected to your Smart TV via HDMI port.

Chromecast features support over 2000 streaming apps/services such as Youtube, Youtube TV, Netflix, Prime Video, Disney Plus, Hulu, Spotify, Pandora, HBO Now and more. Chromecast requires Google Chrome and can be used from your phone or your laptop.

To connect your laptop to your VizoSmart TV via Chromecast, follow these steps:-

  1. Open the Google Chrome browser on your laptop.
  2. Launch any of the aforementioned streaming services or any supported app.
  3. Press the cast button to connect it to your Smart TV.

The Chromecast comes in quite cheap (starting at $35) and can be installed to multiple Smart TVs around the house!. Check Chromecast Price

2. Connect Using Wireless HDMI

Connect Using Wireless HDMI

Wireless HDMI devices are worth investing in as you can use them to connect to any screen that has an HDMI port. This should be your first option, if available, to connect to your Smart TV wirelessly.

These devices can be used to play casual video games with local multiplayer (as there is a noticeable lag for competitive gaming or your Dark Souls playthroughs!) over your Smart TV or stream your favorite TV shows/movies (or anything really!).

The Wireless HDMI solution typically comes with a transmitter for your laptop and a receiver for your Smart TV. The output results may vary from brand to brand.

The majority of the devices don’t offer resolution above 1080p, so if your Smart TV has a wider screen, the display will be scaled down. We recommend using Nyrius Aries Prime Wireless HDMI if you are looking to buy one.

To connect your laptop to your Smart TV via Wireless HDMI, follow these steps:-

  1. Connect the transmitter via USB port to your laptop.
  2. Connect the receiver to the HDMI port of your Smart TV.

Wireless HDMI solutions can come in quite handy as you can do more than just streaming. Check Wireless HDMI Price

3. Connect Using Miracast

Connect Using Miracast

Miracast is the easiest available solution for your streaming needs and is already installed within your laptop if it comes with Windows 8.1 or 10.

If it is inaccessible, update your drivers or purchase a miracast adapter. This can be used to stream TV shows/movies, play some casual video games and give PowerPoint presentations.

To connect your laptop to your Smart TV via Miracast, follow these steps:-

  1. Hover your mouse pointer over the lower right corner and select Devices.
  2. Click on Project and then on Add Wireless display.
  3. Click on Duplicate if you want to keep the display on both your laptop screen and on the PC screen too or Second Screen Only if you want the display on the Smart TV only.

This is not the most optimal way but it is the most approachable way and it will probably not require any additional device/hardware. Check Miracast Price

4. Connect Using Steam Link

Connect Using Steam Link

Steam is probably the best platform to enjoy your favorite games and is one of the reasons why PC gaming is preferred by many.

Although Steam Link did not make impressive sales and the production has been discontinued, the device is pretty good for streaming. Steam Link now has an app for all your Android-based devices (that includes your Smart TV too).

There are several titles that look better on a bigger screen and Steam Link just offers that. Your premium gaming laptop or computer can be connected to Steam Link which displays the processed video and audio data on your Smart TV.

The controller feedback is sent from the Steam Link to the computer. Steam Link can run any game that is available in your Steam Library. The interface utilized is Steam’s Big Picture mode.

To stream your games on your Smart TV via Steam Link, just connect it with your laptop and your Vizio Smart TV and you are good to go. Check Steam Link Price

5. Connect Using Plex

Connect Using Plex

Plex is another one of the easiest solutions that do not require additional hardware. It is a software app that can stream all of your audio and video files from a device to any other device, provided the app is installed.

This can also be used to record live TV by using a USB Tuner. Plex can be used to stream on various devices as long as you have internet connectivity.

The free app has a lot of features too but some advanced features like the live recording, sync for the offline storage so you can enjoy your audio/video when you don’t have internet connectivity, and a lot more are available on the Plex Pass.

The only downside is that you have to register via the server software and the app doesn’t support screen mirroring. So this app can not be used to stream any games

Frequently asked Questions

1. Why choose Vizio Smart TV?

Vizio features models that are easily available from your electronics retailers and they are capable of displaying high definition images. The image quality is not as good as what Samsung offers but the pricing for the Vizio alternatives gives their Smart TVs an edge in the market.

It has several different models with several different display resolutions and the sound quality is good enough for it to be considered among its competitors too.

2. Which connected method is better wired or wireless?

Wired connectivity has always been superior to wireless alternatives with respect to response times. But generally speaking, the difference is not that noticeable unless you are gaming. Even so, when you are playing casual local multiplayer games with your friends and family, wireless connectivity isn’t that bad.

Wired connectivity also holds an edge over the wireless methods when it comes to ease of access and installation steps. The process is as easy as “Plug and Play” and you can utilize the connectivity to stream your audio/video files, listen to music on Spotify/SoundCloud, watch videos on YouTube or any streaming site at all; what you can access on your computer’s screen, you can access it on your Smart TV too.

On the other hand, wired connectivity can be quite a hassle as you have to run wires from your computer to your Smart TV and it is hard to find cables long enough that can be run from the ease of your couch/bed to your Smart TV (even if you do, the cable management is going to be quite messy).

In the case of wired connectivity, the only way to access your library is quite limited too. It is better to have wireless options available which suit your preferences.

3. Can you use the Steam Link app with Vizio Smart TV?

Unfortunately, Vizio Smart TVs don’t fall in the category of the devices that are supported by the Steam Link app as Vizio Smart TVs don’t have the Android OS.

It is also very unlikely that they will add support for these in the future. If you didn’t get your hands on the Steam Link device, you can check various sites for the availability of the limited stock.

4. Is it possible to cast to Vizio Smart TV using your iPhone or any other smartphone?

Yes. SmartCast app enables you to access all SmartCast devices from your smartphone and this includes your iPhone or any other Android Phone. SmartCast offers you full control over your Smart TV.

Final Thoughts 

Although wired connectivity to your Smart TV screen is preferable for lag-free connection, wireless connectivity is better in every other aspect.

The options that are easily available, such as Miracast and ordinary Wireless HDMI, will of course have some limitations but they are better suited for some situations and are versatile. The expensive solutions offer premium features such as support for 4k but these options don’t offer streaming for games.

If you need to play games on your Smart TV, there are other options available such as the Nvidia Shield (if you have an Nvidia GPU) or you can keep using Miracast or Wireless HDMI, with the limitations mentioned.

If gaming on the big screen is not something of your concern, Chromecast or Plex will suffice for your streaming needs.

guruverdict.com is a participant in the Amazon Services LLC Associates Program and we get a commission on purchases made through our links.