
PC gaming is one of the best ways to get entertained. The gamers love to play high-ended video games on PC due to many reasons and today I will show you how to optimize Windows 10 for gaming and enjoy beating your rival with some extra performance.
The numbers of PC gamers are sky-rocketing. As per the latest reports, about 1.2 billion people around the world play video games on PC.
The latest Microsoft operating system Windows 10 enhanced this attraction of playing video games on a PC. A gamer cannot find a better platform to play any kind of video game with any restrictions.
It has been quite a time since Windows 10 hit the grounds. Even after 4-years using this OS, I see most of the pro-gamers are not using this operating system to the fullest throttle. Either they are unaware of many useful features or they do not know how to get them in use.
It is crucial to optimize your Windows 10 for gaming. You need to ensure your system has everything needed to run the latest titles video games.
Just check the requirements, as, during the game, the system must not bother you with unnecessary pop-ups. To make it sure, the system must not affect your gaming, you need to disable many features, application or software.
In this article, I am going to cover various areas of optimizing Windows 10 for gaming. Windows 10 has huge offerings for potential gamers, and a pro-gamer must learn those features and add value to PC gaming.
If you are the one finding it hard to optimize Windows 10 for gaming, you need to stick to the screen and read the entire article, I am sure at the end of this, and you would get your issue cleared.
Optimize Windows 10 For Gaming: 15 Best Tweaks
- Windows 10 Gaming Mode
- Windows 10 Visual Effect Settings
- Disable Steam Auto Updates
- Max Power Plan
- Keep Your Drivers Up-to-Date
- Installing DirectX 12
- Set Your Active Hours
- Turn Off Mouse Acceleration
- Disable Automatic Update and Restart
- Disable Unnecessary Startup Programs
- Disable Wi-Fi Sense
- Upgrade Components
- Clean Up the Registry with Ccleaner
- Closing Unused Apps
- Uninstall All Irrelevant Software
1. Windows 10 Gaming Mode

The gaming mode is specifically designed to help the gamers to boost up the gaming performance. This latest innovation works with optimizing the Windows hardware by focusing the gaming needs.
The computer enabled with the gaming mode will prefer gaming tasks more than any other in the queue. This changes the entire priority system, and you suddenly witness a boost in gaming performance.
In simple words, this mode is solely dedicated to windows PC gaming. If a user switches to this mode, the PC will prefer gaming tasks execution over other background tasks. The users can easily switch to this mode and make the computer render the highest level performance for gaming.
- Go to Windows setting
- Click on the gaming options
- Click on the Game Mode tab
- And turn the gaming mode on
The Windows PC gamer can switch to this mode while playing the game. You just hit the “Windows+G” keys. The game bar will surface, from the bar, switch to the mode.
2. Windows 10 Visual Effect Settings

- Press Windows key +I
- Press performance
- Select Adjust the appearance and performance Windows
- Click Adjust for best performance
- Apply Changes
- Press OK
In simple words, our computer installed Windows OS is set to provide a beautiful shiny interface. Here in PC gaming, we need every inch of the processor into gaming. So, we are disabling all shiny visuals to add-up the total performance towards gaming.
3. Disable Steam Auto Updates

But, some necessary updates can fetch you out of the playground and put in the queue waiting. This wait kills the playing experience and makes you think over disabling the auto-updates.
Though, all updates cannot be disabled from one button. There are no such options. You can disable those updates which can pull you out from the middle of the game.
- In steam, account selects the settings
- From the settings click on Downloads
- Now, you can uncheck the download during the gameplay.
Now, you are good to go. This optimization will leave you to experience the finest and hiccup-free gaming experience.
4. Max Power Plan To Improve Windows 10 Gaming

Yes, I have proof of my statement. It’s has been tested that a Windows computer comes at the highest level of frequency when the power plan is set to the highest level.
The overall CPU performance improves, thus the gaming tasks expedite. This tweak can help you in improving gaming performance and producing efficiency to process the remaining tasks.
- On the left side of the Windows click on the Windows icon
- Select the power option
- Click on the Additional power settings
- Make sure the power saver plan should not be chosen
- Select the high-performance power plan
By default, Windows 10 uses a balanced power plan setting. It means the computer will only generate enough power required to tackle the latest task.
5. Keep Your Drivers and GPU Up-to-Date

You should always make sure the latest available updates installed in your system, along with GPU updates. Windows itself is efficient in releasing regular updates and keeps close eyes to the system security.
- To install the latest updates you need to follow these steps
- Click the start button on the lower-left corner of the screen.
- Click on update and security
- Click on the check for updates
Wait for some minutes to update your operating system. This sometimes takes several minutes, even hours. Have some patience and stick to this step until unless all necessary updates installed.
Graphics Card Update
For gaming, the GPU is a crucial component. If your GPU is not up to date according to the latest innovations, the latest AAA titles might not run seamlessly.
Windows also help you with GPU updates. The GPU updates are a pain in the neck and most of the time eat hours to get installed.
- Find the model of your graphics card
- Go to the manufacturer website and search for your GPU model
- Download the driver and install them
- Restart your system
You can use different driver software to get this done. The driver software such as Driver Easy is a great tool to find all necessary driver updates and install them automatically.
6. Speed Up Windows 10 By Installing DirectX 12

This also decreases the processor utilization for other tasks such as boost. DirectX has been a front-runner for the Microsoft operating systems. This accelerates multimedia applications such as 3D games and videos playing.
If you have not already installed DirectX 12 in your gaming system, just install it. If you have an older version of it, update it to the latest version.
7. Set Your Active Hours
 The Active hour feature of the Windows 10 is a double-edged sword. It helps the users get updates without manually turning on the updates.
This active hour function is set up to run updates in the system in non-active hours. This checks whether the user using the computer or not and install updates.
This feature can make you spoil your gaming experience from the core. I have seen people losing in battleground just because the key players’ system restarted automatically.
This happens when you do not set the active hour feature and let the computer decide it wholly by itself. This would not resort to an issue for a casual gamer, for a pro gamer, it is more than a disaster.
So, always use your active hour feature wisely and make the proper settings to restart the computer when you are not using it.
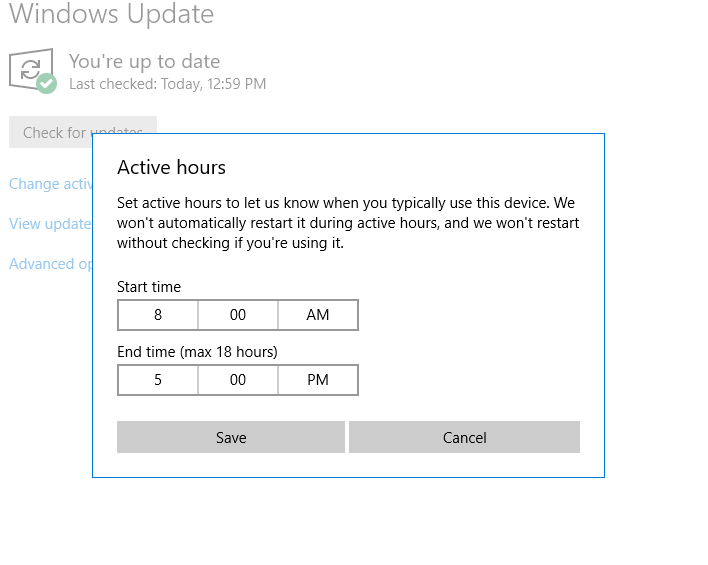
You can configure it by following the mentioned procedure.
- Settings
- Update and security
- Change active hours
- And set the hours when you do not play games at all
If you are impulsive and do not know your gaming hours, you can completely turn this feature off.
8. Turn Off Mouse Acceleration

Point precision, hidden in the control panel, makes your mouse not only move on the basis of movement but speed.
- Go to the control panel
- Select Hardware and sound
- Click devices and printers
- Choose the mouse from the menu device
- In the mouse properties, windows click the pointer options
- Uncheck the enhance pointer precision
- Click on Apply
- You are done
9. Disable Automatic Update and Restart
 The updates installation makes the system less vulnerable towards hackers, Trojans and key loggers. The latest Microsoft operating system Windows 10 updates also keep your system smooth. You need to install the latest updates and keep the system up to date.
The problem is sometimes these automatic updates hinder in the middle of the games. You are playing a game and aiming at your enemy, suddenly in the middle of nowhere, update pop-up surface. This makes you miss the shot or killed yourself.
The gamers must turn this feature off, but keep visiting the section regularly. As the latest updates can help you boost the gaming process as a whole.
To turn this feature off, you need to follow the mentioned instructions.
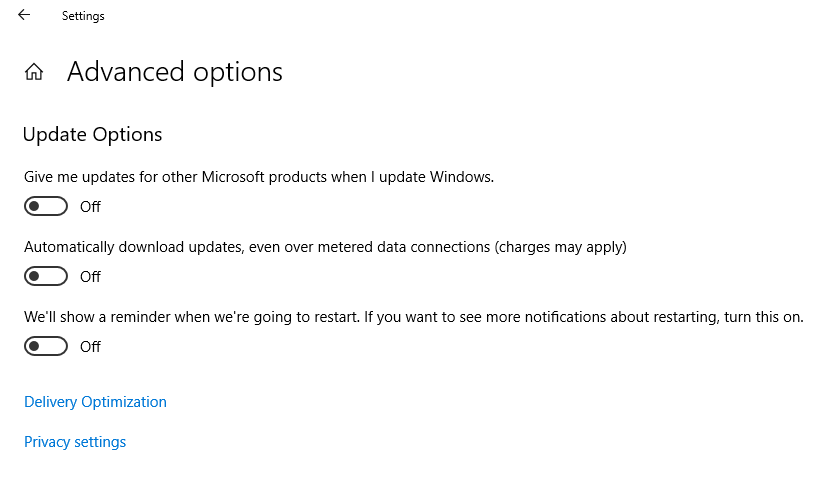
- Open the Windows setting
- Click on the updates and security
- Under the Windows Update tab, you see an advanced option
- Click on it and see the automatic update setting
On the front of other gaming programs, such a stream or other game stores, such automatic updates come in the middle of the game. You can follow the same procedure to turn them off.
If you turn the updates off, you would not ever face an automatic system restart ever. Automatic restart really kills the amusement from the game and sometimes works against you and your team in the battleground.
10. Disable Unnecessary Startup Programs

These programs most of the time runs in the background without the user knowing. I just checked mine now, and I am awestruck about half of the dozen unnecessary and useless startup programs were there without me knowing.
I think most of gamers do not know the number of programs and they slow down the performance while in-game. You can check the startup programs and can disable accordingly.
- Open the Windows setting
- Click on the Apps
- Click on Startup option
- Turn ON/OFF according to your needs
Some startup also helps your security and you need them running in the background such as defenders. Do not turn off such startup; they help you against viruses and Trojans.
11. Disable Wi-Fi Sense

Such as you went into a Coffee Shop and connect your system with free WI-FI. Next time, you pass by that coffee Shop; your system will automatically connect to that system without asking you manually do it.
In the same ways, it works for hotspot sharing and saves the password. In the mechanism of storing the data and connecting to the network, there are loopholes, vulnerabilities.
Upon, noticing those vulnerabilities the expert advice to turn off this feature. This stores the password upon sharing your system’s information to the network.
It leads to security concerns and you need not use it for gaming. This is easy to turn off. Just follow the mentioned steps.
- Open the Setting App
- Choose Network and internet
- Choose WI-FI
- Disable all options under WI-FI sense
12. Upgrade Your RAM, SSD, and Graphic card for Graphic intensive games
If you really want to stand out in the gaming zone, you need to upgrade your system’s hardware. This is one of the most beneficial and crucial steps towards optimizing your Windows 10 for gaming.
This is very effective and will make you achieve the highest level of gaming. If you do not have enough budgets can go with any of them.
I would recommend upgrading both of this hardware and getting a smooth sailing in undisturbed water.
RAM upgrade
Adding more memory to your computer increases the speed of the computer. This also helps programs launch swiftly and boost multitasking.
Your system will be handling more than one task at one time. Install a new memory on your system of the same model.
Upgrade to SSD Hard drive
The hard drive stores your games and other data permanently. Solid State Drive aka SSD is the fastest storage disk you come across.
These drives increase the retrieval time of your data and your gaming speed accelerates. Once you get to use this type of hard drive, you would never be able to use conventional hard drive ever.
Upgrade Graphics card
GPU aka Graphics card is the team behind handling visuals. When you are about to deal with a plethora of visuals, GPU assists CPU and makes the process super-fast.
If your system speed is slow and takes time in displaying high-ended videos, you need to upgrade the graphics card. The card will enhance your gaming experience and you enjoy it from the core of your heart.
13. Clean Up the Registry With Ccleaner

Windows 10 registry is used to store the data, information, and settings about the application, software, and other Windows files. This helps the system launch and access anything on the computer easily.
When we play games and use our computer days and days out. The number of information, settings data, and data about the games and preference reached the highest level. This takes a load from the processor, and the processor has to deal with this data along with the game processing.
If you do not delete the registry files after some days or weeks, you see a marginal difference in the speed of the computer. The speed of processing that can be used to process your games is wasted in doing nothing.
You can manage that registry and delete them. There is no automatic way to delete useless registry files. A user has to do it manually using third-party software such as Ccleaner. This software helps you delete useless registry data and clean up the entire system’s registry.
- Download Ccleaner and install it on your computer
- Run this program
- Click on registry
- And clean up the registry file until no file remained there.
14. Closing Unused Apps

They drain our battery, show unwanted notification and sometimes come into the middle of the gaming. We need to close those unused apps in order to optimize your Windows 10 for gaming.
In Windows 10, you can easily close them by following the mentioned procedure.
- Open settings
- Click on Privacy
- Click on Background apps
- And choose which apps to run in the background and which and close the rest.
15. Uninstall All Irrelevant Softwares

Your system starts taking minutes to start and shut down and you never know what is going with it. If you follow the process mentioned, you easily get all apps and irrelevant software uninstalled. It is very easy to get rid of that software and uninstall them with one tap.
- Press Windows icon
- Open settings
- Click on apps
- You can click on any of the programs, obviously unwanted software, and uninstall it.
You cannot uninstall more than one application at one time. Click on one and wait for it uninstalling.
The Final Thought
Windows 10 is one of the finest desktop operating systems you come across to play video games. This comes with a plethora of features and packages to help users in many areas.
The PC’s overall features and performance has made the gamers to find this a better place in term of gaming. The above tweaks will help you better customize your Windows 10 for gaming.
I tried my best to cover all major aspects to speed up your Windows 10 for playing high-ended AAA titles games. A clean and optimized computer is must have to run the latest video games and run them smoothly.
I hope this guide helps you playing video games without freezing or rendering graphics errors. If you have any questions or ask something to ask, feel free to pour your heart in the comment section.
I am here to help you out and provide a suitable solution to the problem. 🙂


1 Comment
Great guide! I think it covered pretty much everything. I agree on CCleaner. A great little program that makes wonder on your laptop performance. Recommended!